
Introduction
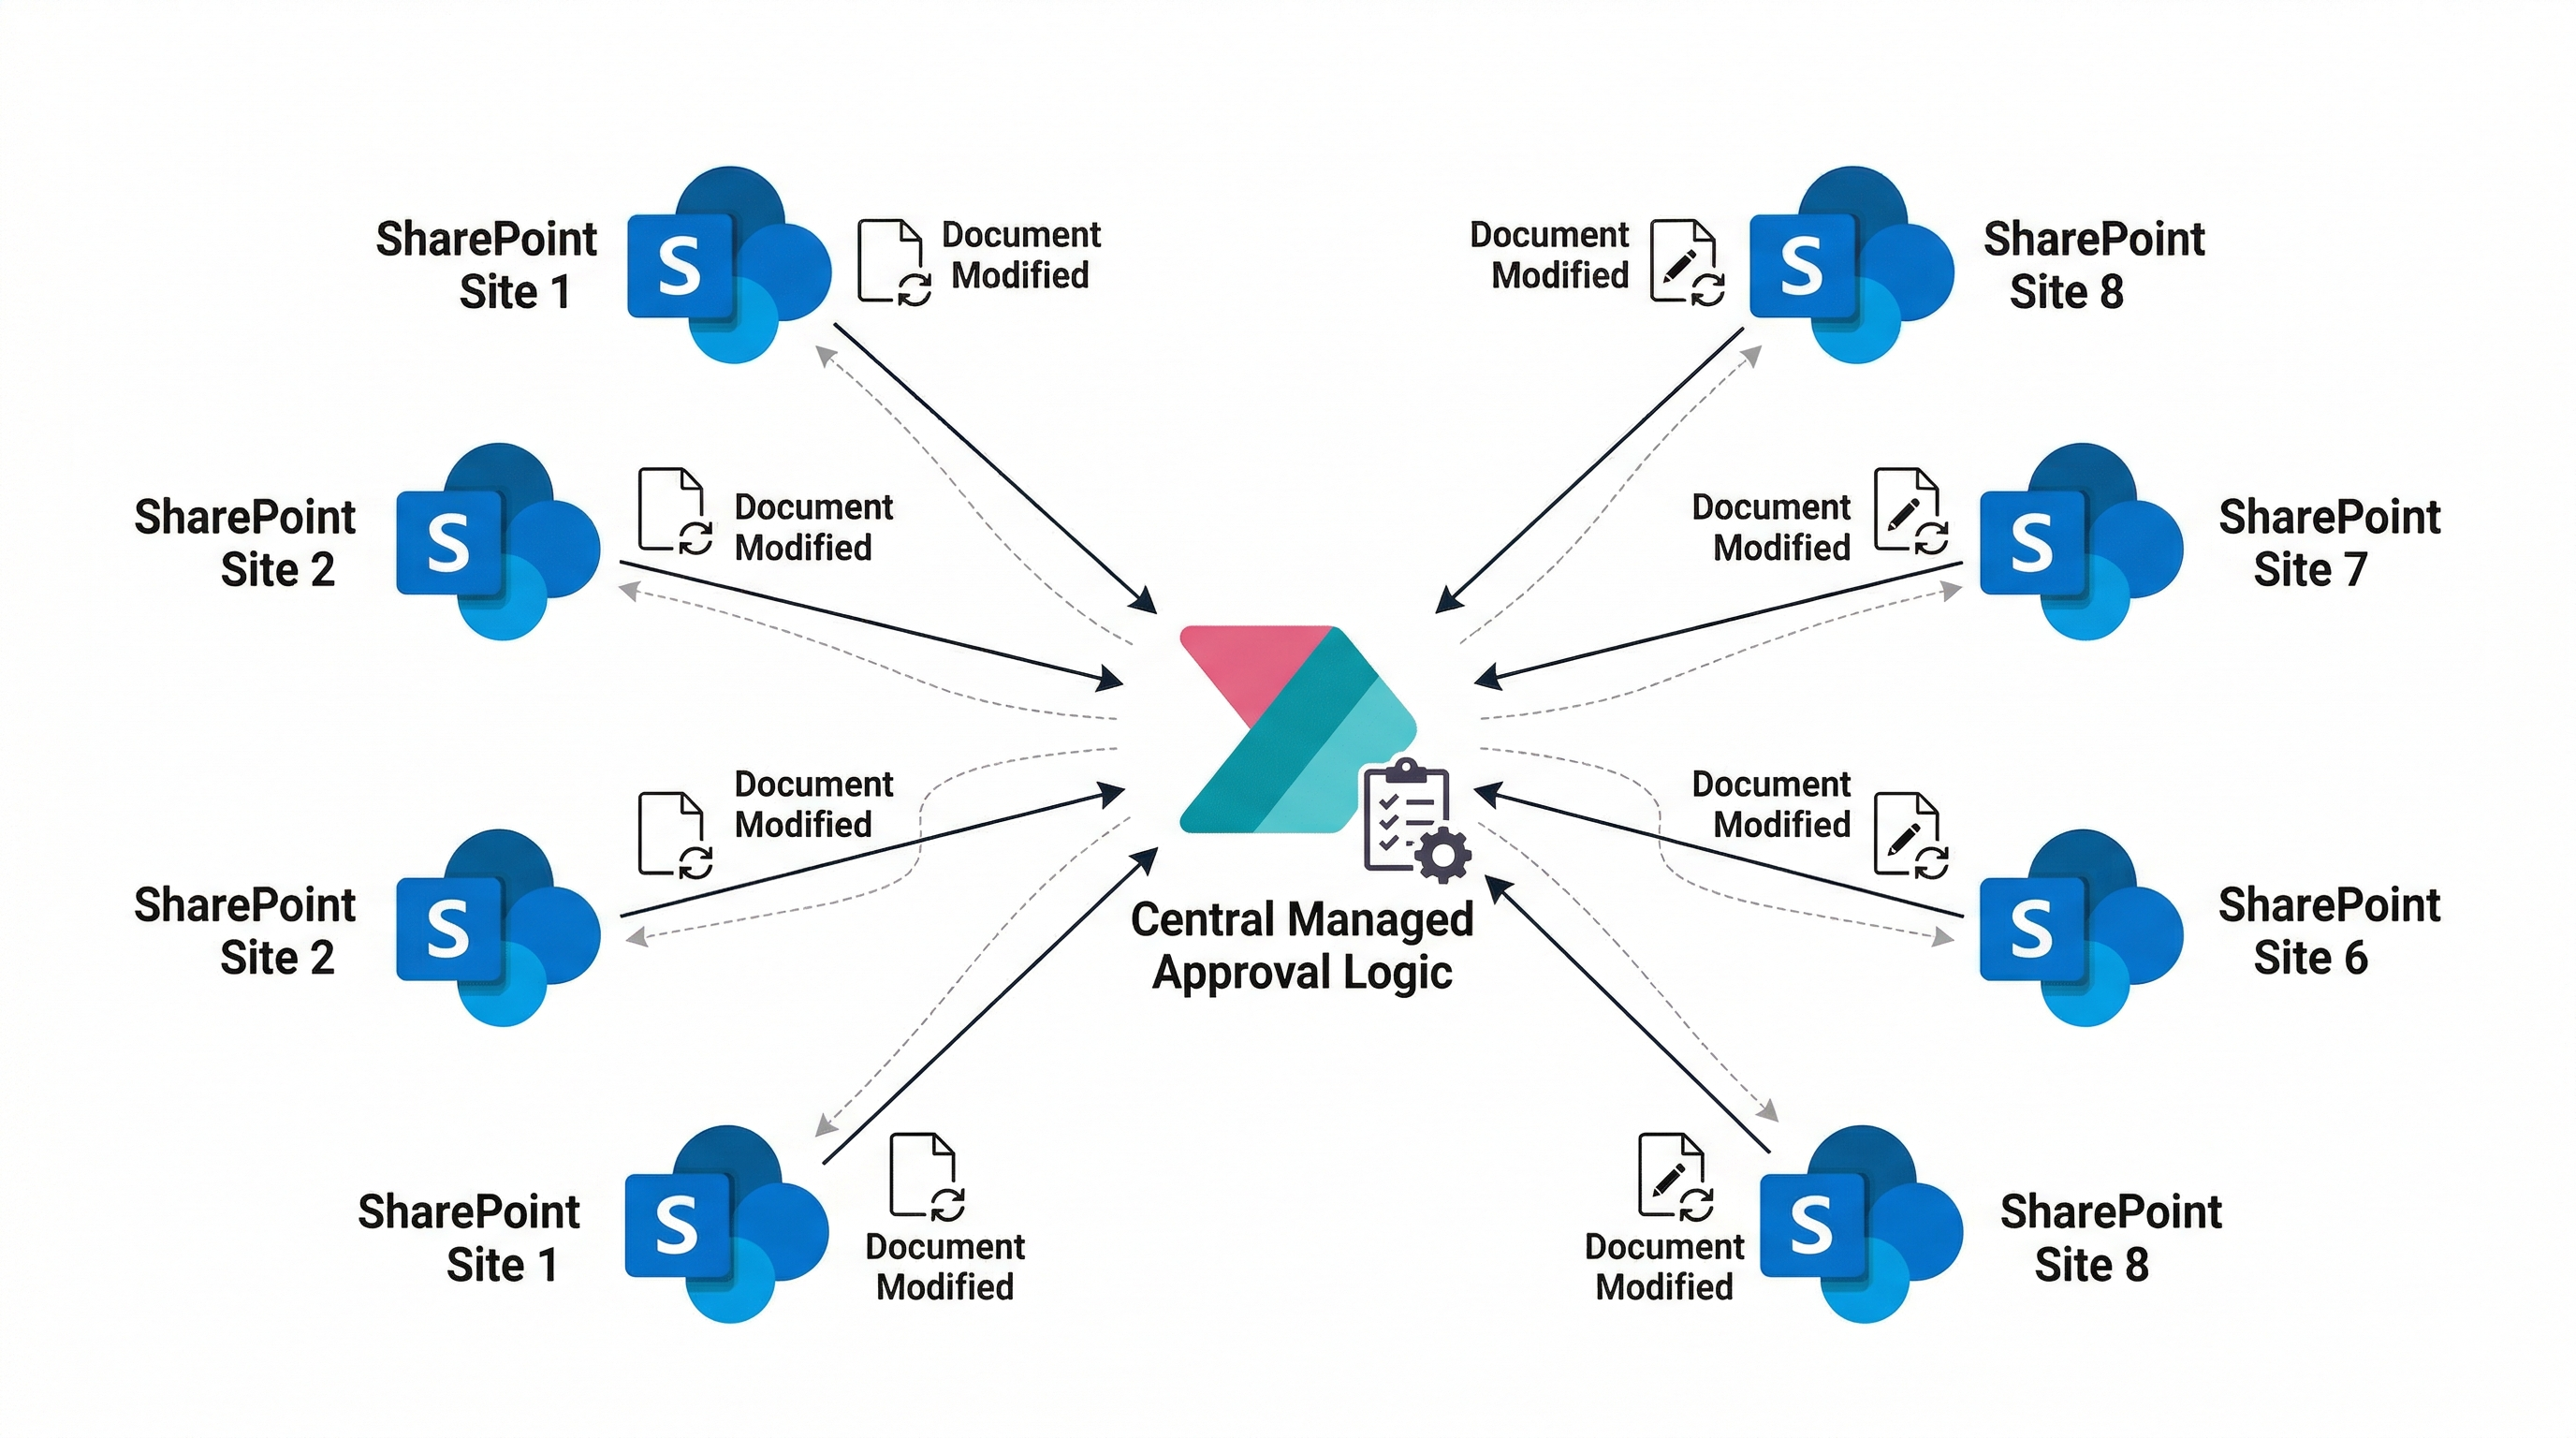
When you build a document trigger on top of SharePoint, you quickly run into a fundamental constraint: a SharePoint trigger Flow is hardwired to a single Site and Library. There is no native way to point one Flow at a dynamic or configurable location. The Site URL and Library GUID are baked into the trigger definition at creation time.
For a one-off deployment that’s fine. But when you’re setting up a standardised Processes & Procedures programme across an organisation where every Team or Business unit gets its own SharePoint Site, you need an approval trigger Flow for each one. Creating and maintaining these by hand rapidly becomes a maintenance problem: if you fix a bug in one, you have to fix it in all of them.
This post walks through the solution we built to address that: a Site-specific Provisioning Flow that clones a template approval trigger into a new, Site-specific Flow and turns it on automatically, using nothing more than Dataverse, Power Automate, and a clean separation between configuration data and Flow logic.
Update (October 2026): the first version of this post ended with a manual step: someone had to open each cloned Flow, save it and turn it on. That step is gone. The Provisioning Flow now turns the clone on itself. The new sections are Step 8: Turn the Flow On, Why “Turn On Flow” Doesn’t Work and Connections, Connection References and Who Is Signed In.
The SPO P&P System at a Glance
Before diving into the provisioning Flow, it’s worth establishing the wider architecture of the solution.
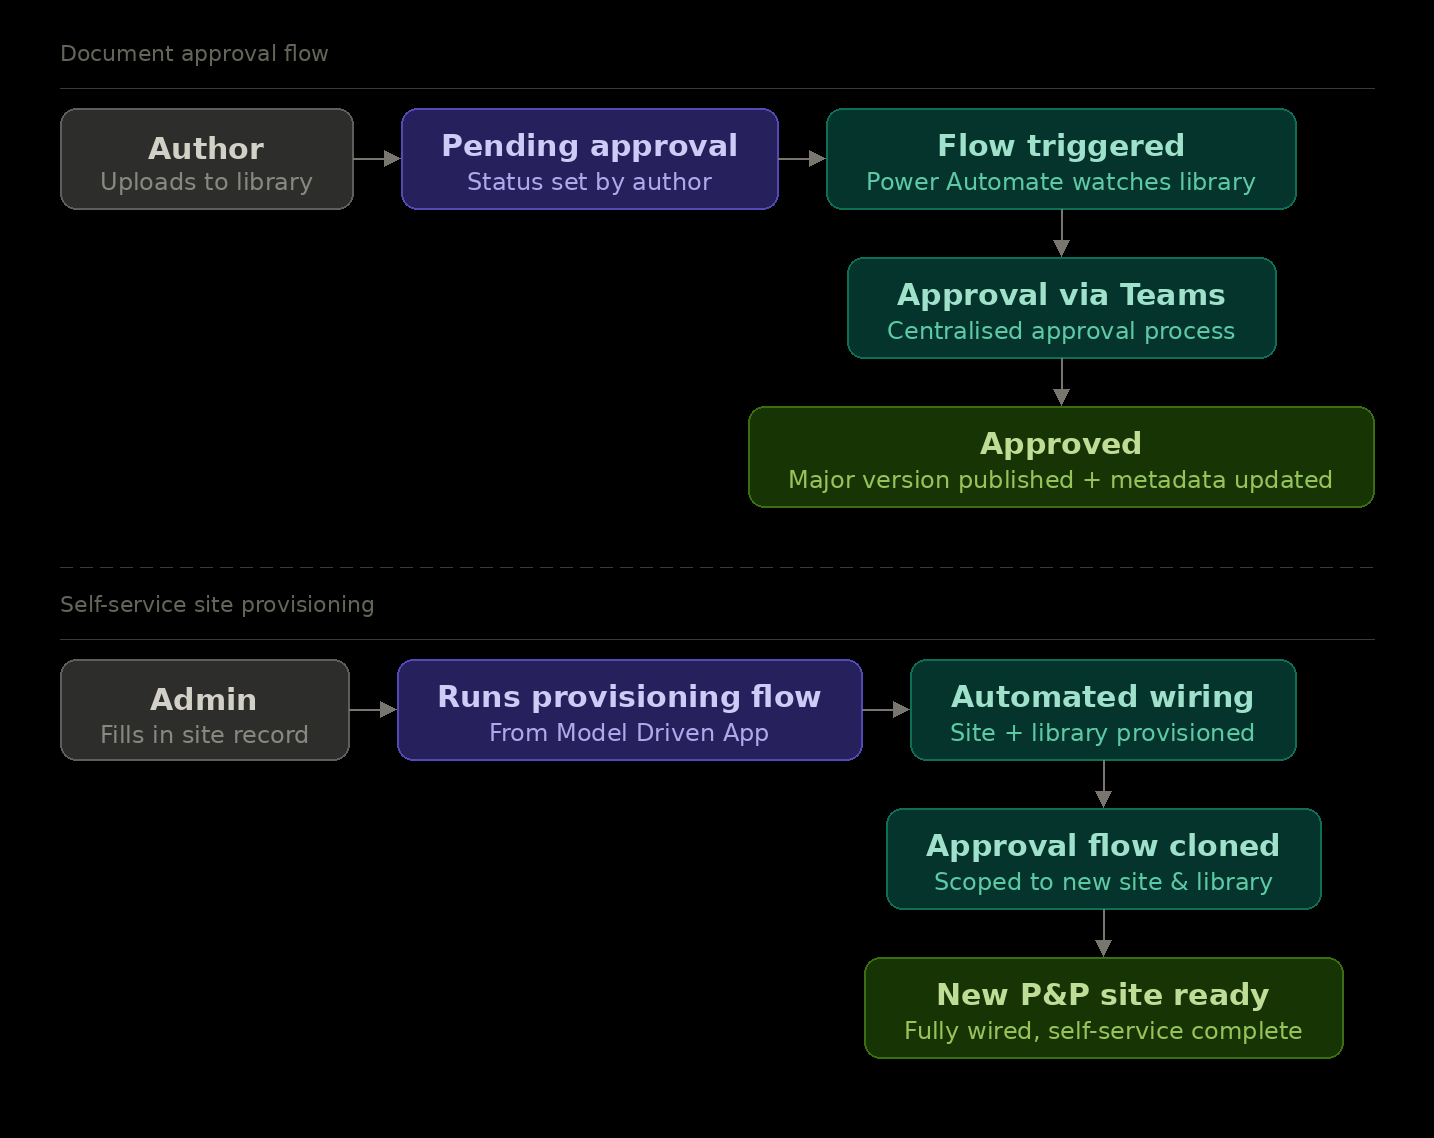
Each Processes and Procedures Library is in a SharePoint Site. Authors upload documents to the Library. When a document is submitted for approval (its approval status set to Pending Approval), a Power Automate Flow fires, routes the approval through a standard and centralised process via Microsoft Teams, and on Approval publishes the document to its major version and updates the approval metadata. This process can be maintained and changed whenever required and is all done in one place.
That last Flow, the one watching the Library for changes, is the one we need to clone. It is specific to a Site and Library. The goal of this project was to make provisioning a new P&P Site a self-service operation: an admin fills in a record, runs a Flow from the Model Driven app, and everything wires itself up automatically 😀.
The Three Flows
The solution contains three Power Automate Flows that work together:
| Flow | Role |
|---|---|
| SPO PP - Provision Site Flow | Orchestrator: clones the template, provisions a new Site-specific Flow and turns it on |
| SPO PP - Approval Trigger - TEMPLATE | Template: the Flow definition that gets cloned for each new Site |
| Child: PP Approval Standard Process | Worker: handles the actual approval logic, called by every cloned trigger Flow |
The template and child Flows are permanent, shared fixtures. The cloned approval trigger Flows are generated at provisioning time, one per Site. We can have as many of these as we want, but they all point to the same child Flow so we can control the centralised process in one place.
The Site Registry Table
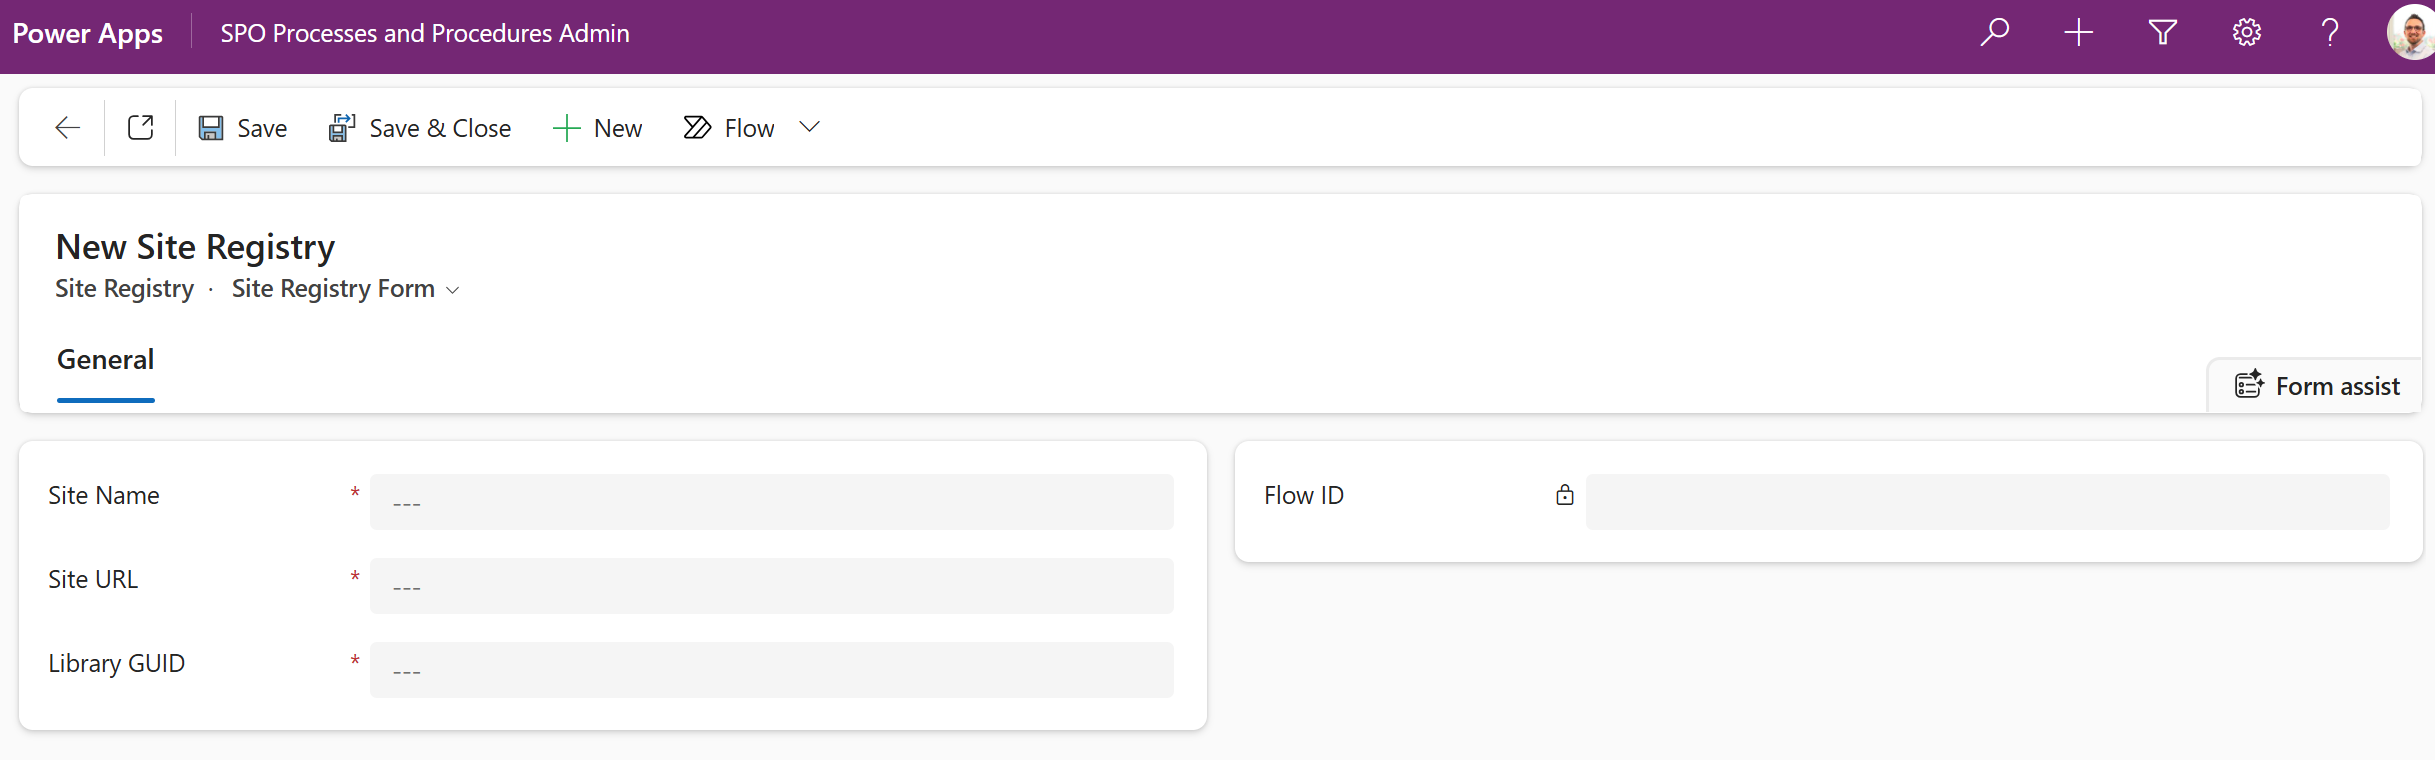
The hub of the whole system is a custom Dataverse table: Site_Registry. It stores one row per P&P Site and acts as the source of truth for both provisioning and ongoing operations.
Custom Columns
| Display Name | Logical Name | Type | Required | Purpose |
|---|---|---|---|---|
| Site Name | Sitename | Text | Yes | Human-readable name; also used as the Primary Name field and in the provisioned Flow’s display name |
| Site URL | Siteurl | Text | Yes | Full URL of the SharePoint Site (e.g. https://companySite.sharepoint.com/Sites/Finance) |
| Library GUID | Libraryguid | Text | Yes | GUID of the Document Library within the Site, required by the SharePoint trigger |
| Flow ID | Flowid | Text | No | Written back by the provision Flow after cloning; links this registry entry to its live approval trigger Flow |
| Site Registry ID | Site_Registryid | GUID (Primary Key) | System | Auto-generated unique identifier for the row |
The Flowid column starts empty. It is the only field the provisioning process writes. Everything else is entered by the admin before triggering provisioning.
Why Library GUID, Not Library Name?
The SharePoint When a file is created or modified (properties only) trigger requires a list/Library GUID rather than its display name. GUIDs are stable across renames and don’t break if someone tidies up the Library name. Recording the GUID in the Site Registry means provisioning is reliable regardless of what the Library is called. For our template, we can just use a development SharePoint site and a placeholder document Library to keep things simple and standard. I had tried inserting placeholderName and Library-guid-name as placeholders, but the Flow struggled to save.
As a possible improvement in the Model Driven App, we could make selection easier by showing a list of document libraries for the selected site, so the user doesn’t have to go and find the GUID.
The Approval Trigger Template
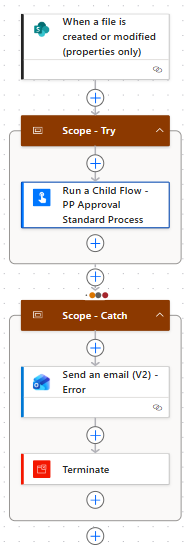
The template Flow (SPOPP-ApprovalTrigger-TEMPLATE) is the blueprint for every Site-specific approval trigger. It lives in the solution and is never activated. It exists solely to be cloned.
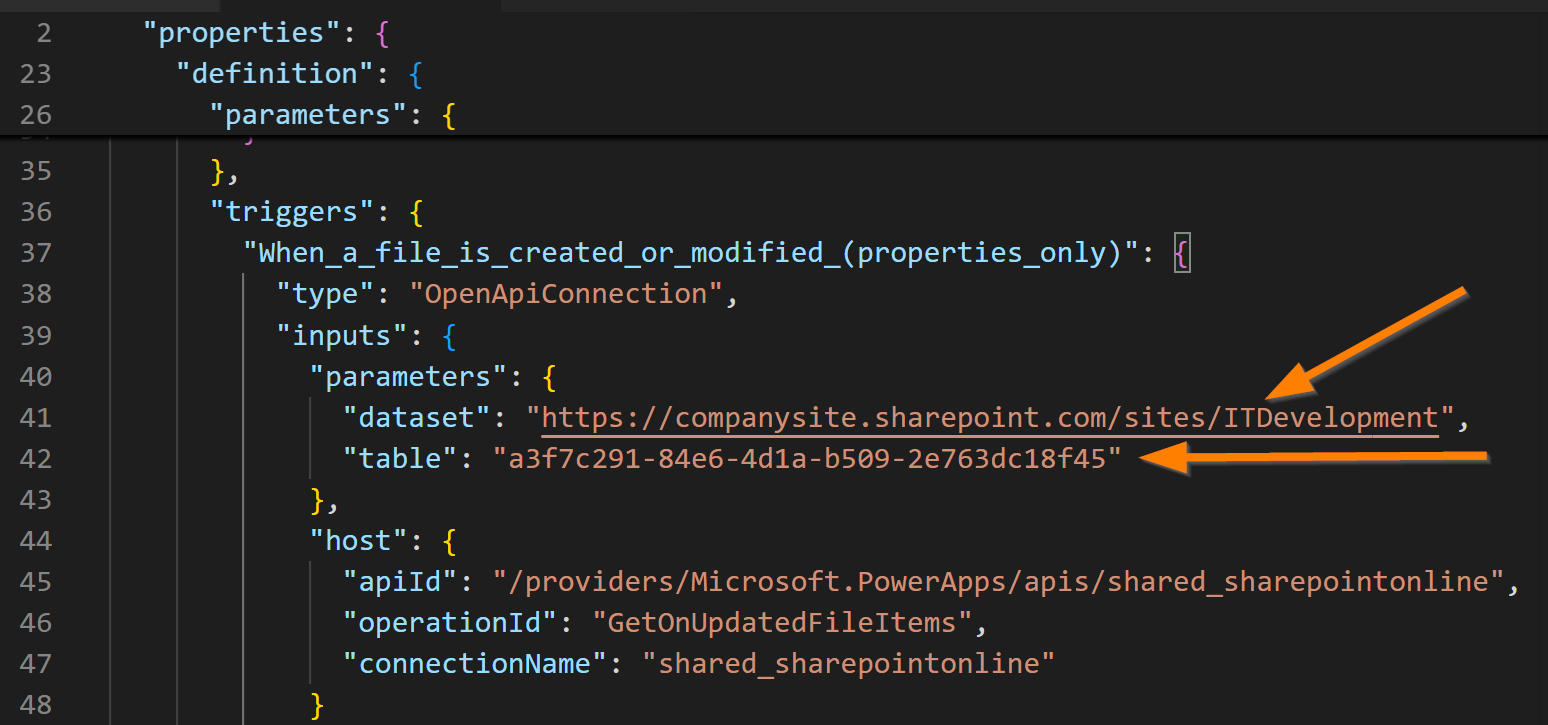
Its trigger is a SharePoint When a file is created or modified (properties only) action polling every 1 minute, pointed at two placeholders:
- Site URL placeholder:
https://companysite.sharepoint.com/Sites/ITDevelopment - Library GUID placeholder:
a3f7c291-84e6-4d1a-b509-2e763dc18f45
A trigger condition filters the events down to only relevant ones:
ApprovalStatus = 3 (Pending Approval)
AND Editor is NOT the service account
This prevents the Flow from firing on system-generated updates and ensures it only acts when a real user has submitted a document for review.
When the trigger fires, the Flow calls a single action inside a Try scope: Run a Child Flow: PP Approval Standard Process. It passes the item’s ID, Site URL, Library GUID, author claims, full path, approval status, and editor claims to the child Flow, then waits for a response.
The Catch scope sends an error notification email to the support desk if anything fails.
Edit the template signed in as the service account. Every connection the template uses gets copied into every clone, and those connections decide whether the clone can be turned on. The connections section explains why.
The clientdata Column: the Key to Cloning
When Power Automate stores a solution-aware Flow in Dataverse, it uses the workflows (“Processes”) table. The Flow’s entire definition (triggers, actions, connection references and expressions) is serialised as JSON and stored in a column called clientdata.
This is the column we read from the template and write to the new Flow. The string-replace approach works because the placeholders (the hardcoded Site URL and Library GUID) are literal strings embedded in that JSON. Swapping them out produces a valid, Site-specific Flow definition ready to run.
The Provision Site Flow: Step by Step
The SPO PP - Provision Site Flow is triggered from the Model Driven App by an admin selecting a Site Registry row and running the Flow from the command bar.
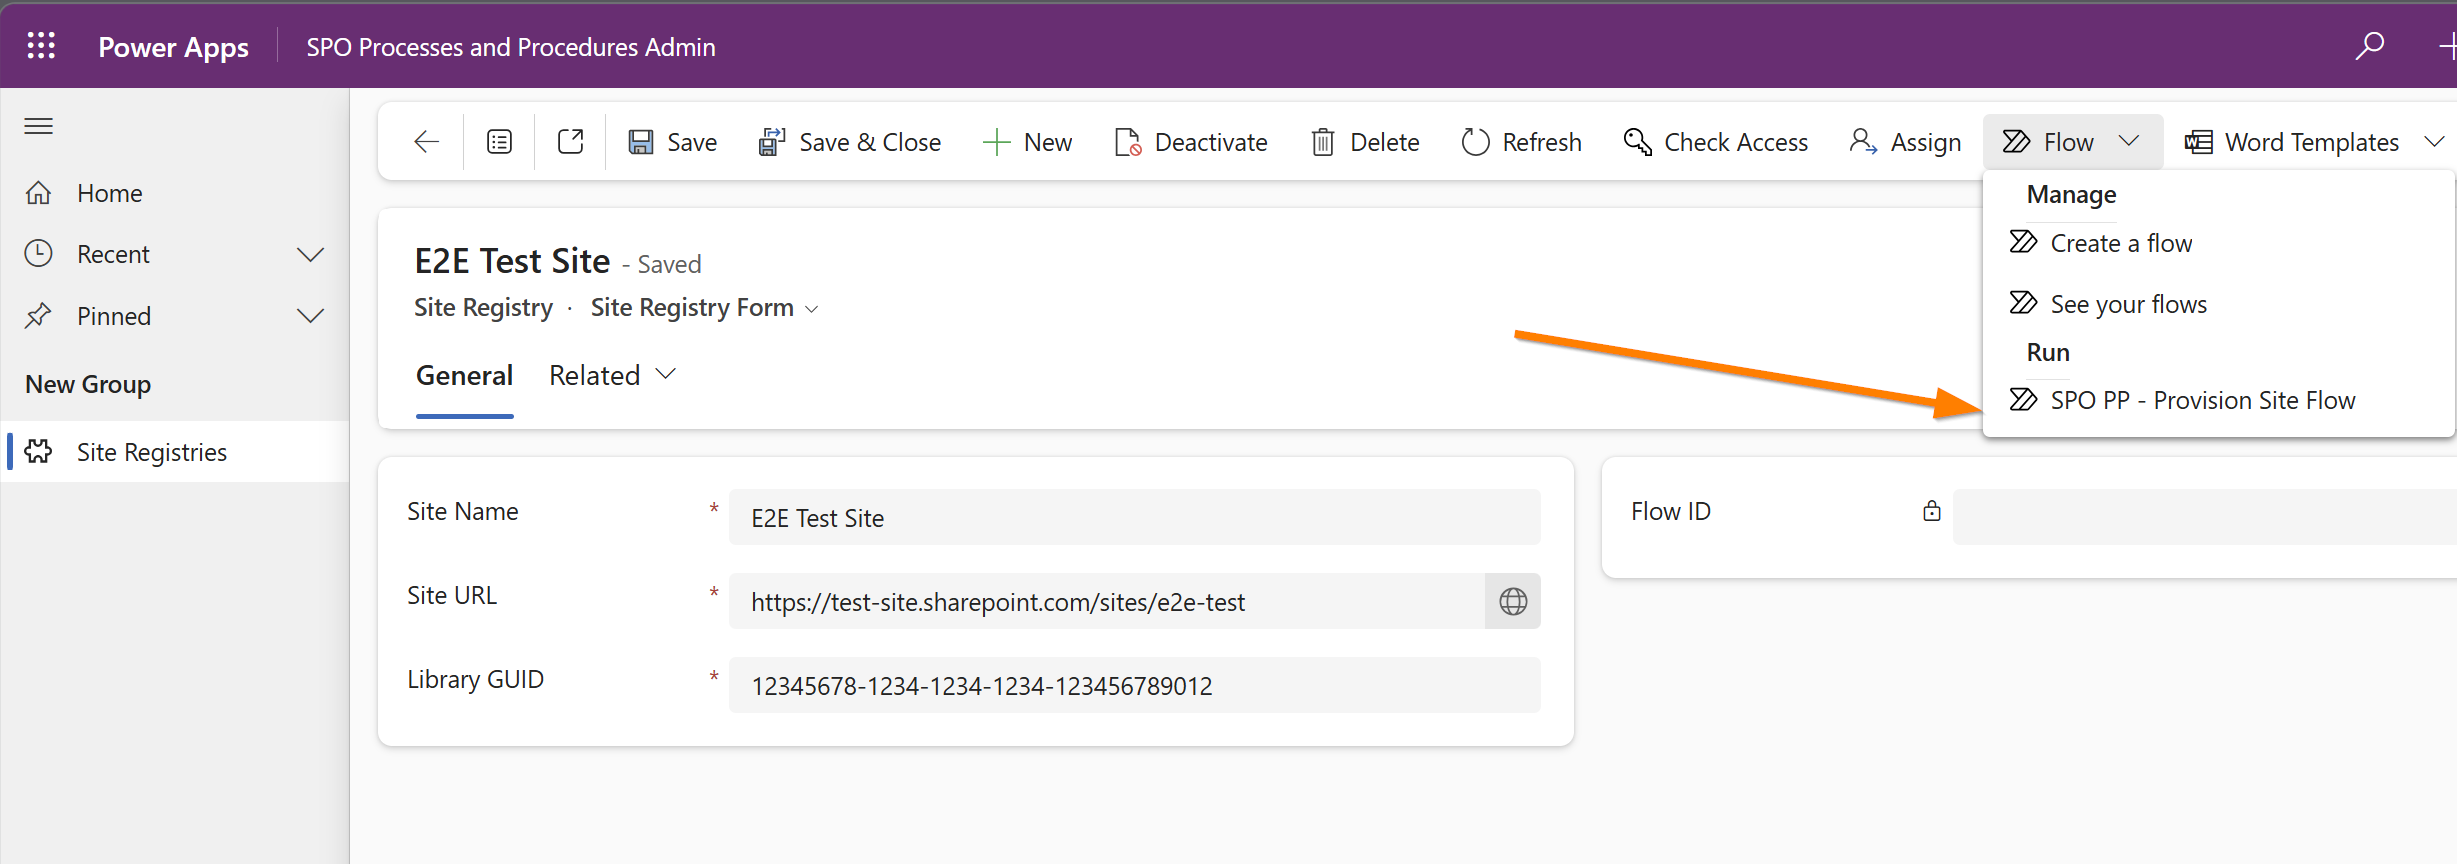
Trigger: Record Selected on Site_registries
The trigger uses splitOn, meaning if multiple rows are selected the Flow runs once per row. Each Site is provisioned independently.
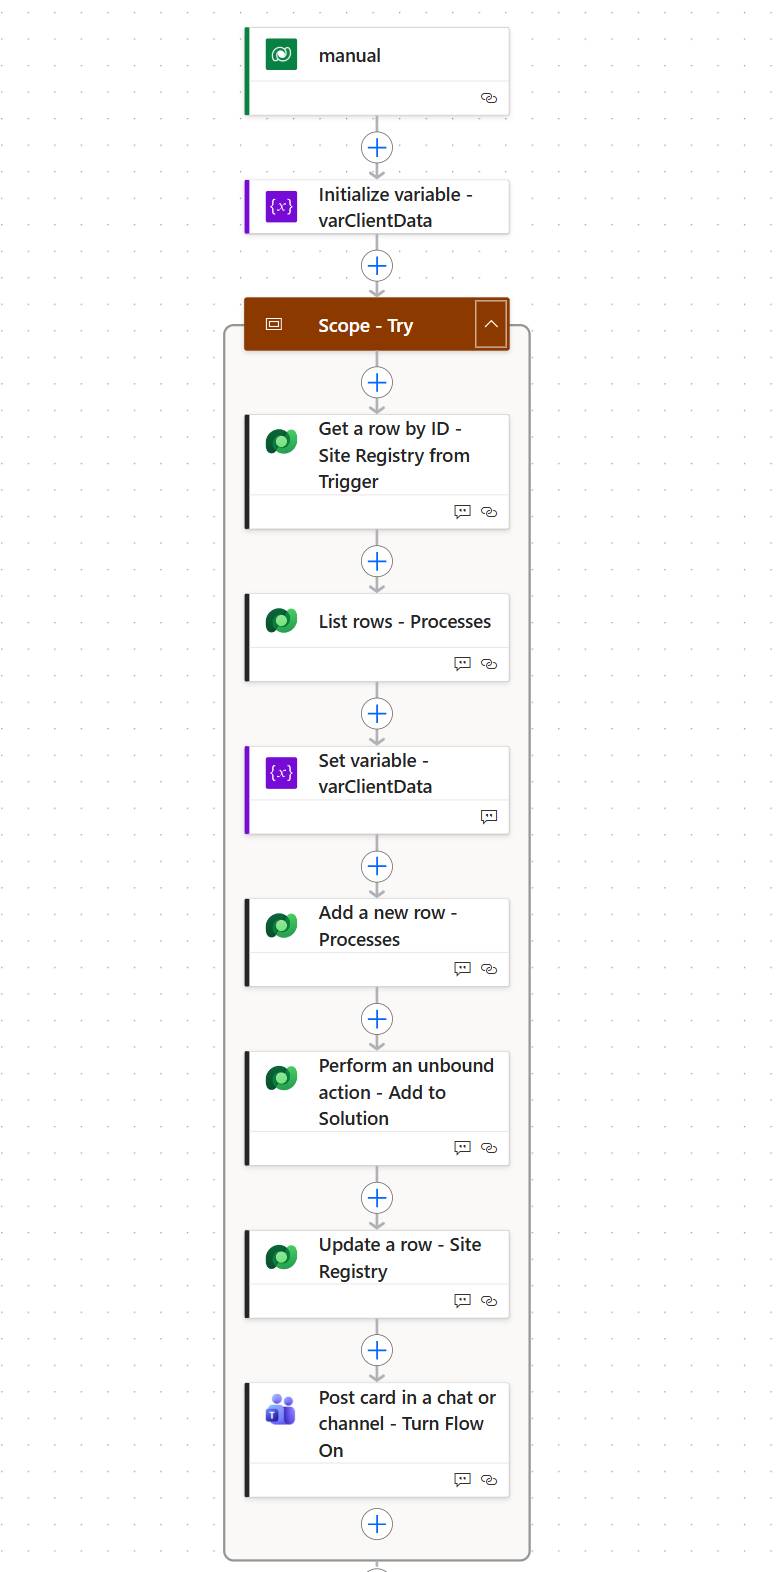
Step 1: Initialise Variable (varClientData)
Before entering the Try scope, a string variable varClientData is initialised empty. This will hold the cloned Flow definition once the placeholders have been replaced.
This is declared outside the Try scope deliberately. Variables must be initialised at the root level, so it needs to exist before any scoped logic to be accessible in both the Try and Catch branches.
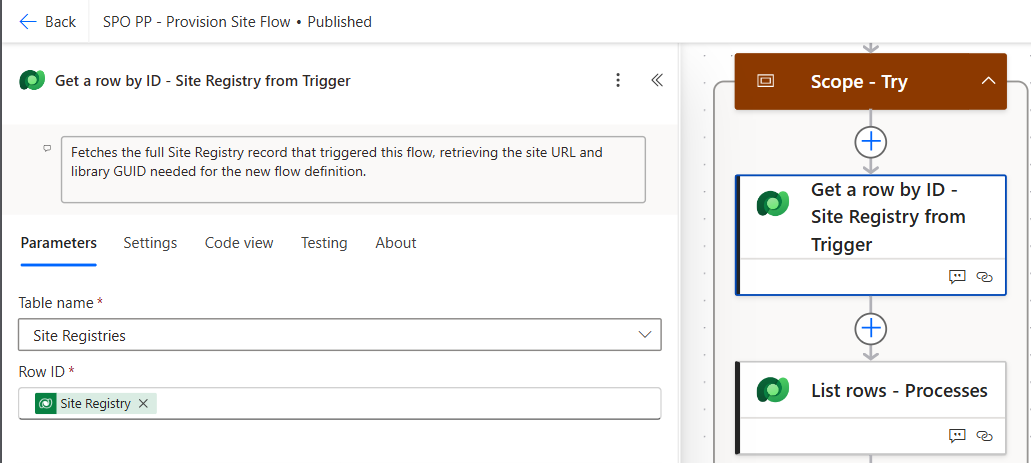
Step 2: Get Site Registry Row (Get a row by ID - Site Registry from Trigger)
The trigger provides the Site_Registryid from the selected record, but only the ID and Site name are included in the trigger payload. We need the full row, specifically the Siteurl and Libraryguid, so the first action inside the Try scope fetches it.
Entity: Site_registries
Record ID: triggerBody()?['entity']?['Site_Registryid']
The output of this action is referenced throughout the rest of the Flow.
Step 3: Retrieve the Template Flow Definition (List rows - Processes)
Next, the Flow queries the Dataverse workflows (“Processes”) table to retrieve the template’s clientdata:
Entity: workflows
$select: clientdata, workflowid
$filter: workflowid eq '05a1a909-5b33-f111-88b3-6045bddd6b33'
$top: 1
The template’s workflow ID is hardcoded here. It is a known, stable fixture in the solution. Using $top: 1 ensures a single result is returned efficiently. (If you’re promoting this between environments, hold the ID in an Environment Variable instead.)
The clientdata that comes back is the full JSON definition of the template Flow, including the hardcoded Site URL and Library GUID placeholders.
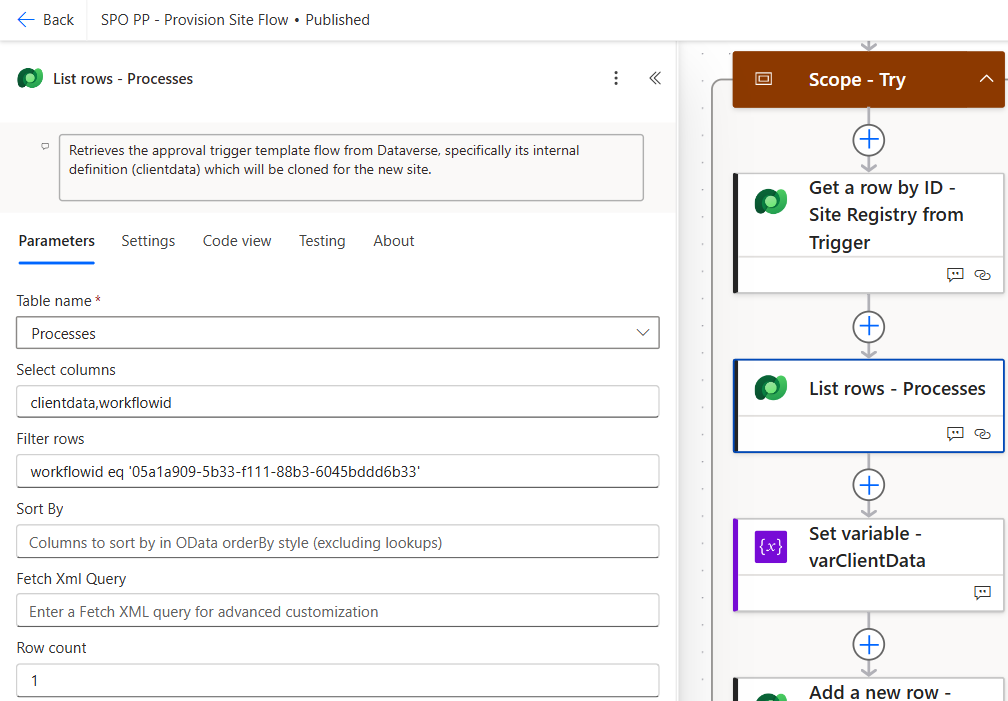
Step 4: Inject Real Values (Set variable - varClientData)
This is the core of the cloning mechanism. A double-nested replace() expression swaps out both placeholders in a single operation:
replace(
  replace(
    first(outputs('List_rows_-_Processes')?['body/value'])?['clientdata'],
    'https://companySite.sharepoint.com/Sites/ITDevelopment',
    outputs('Get_a_row_by_ID_-_Site_Registry_from_Trigger')?['body/Siteurl']
  ),
  'a3f7c291-84e6-4d1a-b509-2e763dc18f45',
  outputs('Get_a_row_by_ID_-_Site_Registry_from_Trigger')?['body/Libraryguid']
)
The inner replace substitutes the Site URL. The outer replace then takes that result and substitutes the Library GUID. The outcome is stored in varClientData: a complete, valid Flow definition targeting the new Site’s Library.
No parsing, no schema manipulation, just string replacement in JSON.
Notice what doesn’t get replaced: the connectionReferences block inside clientdata. The clone uses exactly the same connection references as the template. That matters in Step 8.
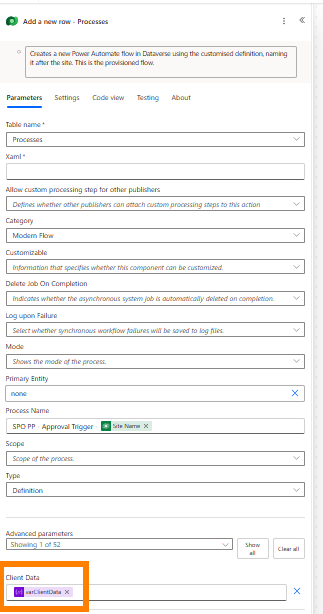
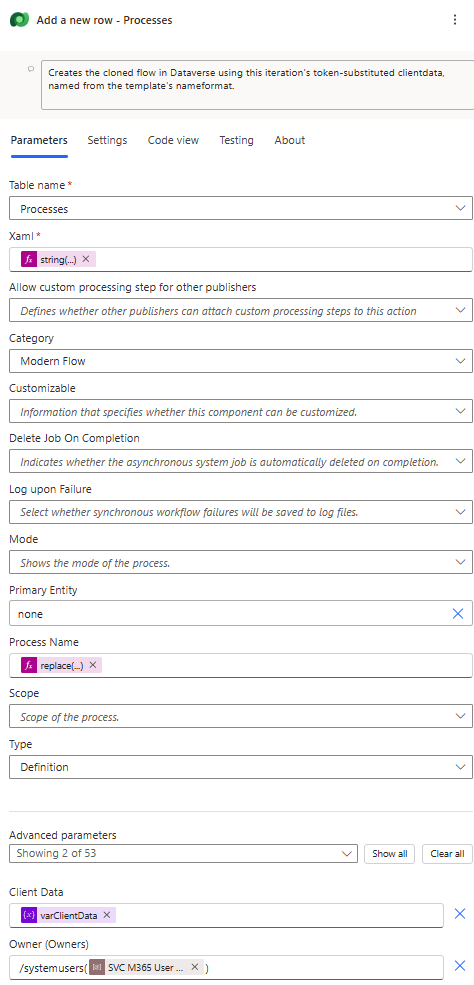
Step 5: Create the New Flow (Add a new row - Processes)
The modified definition is now written back to the workflows (“Processes”) table as a new row, creating the cloned Flow:
Entity: workflows
item/name:              "SPO PP - Approval Trigger - {Sitename}"
item/category:          5        (Modern Flow)
item/type:              1        (Definition)
item/primaryentity:     "none"
item/xaml:              string('')     (required field, but not used for modern Flows)
item/clientdata:        @variables('varClientData')
item/ownerid@odata.bind: /systemusers(@{parameters('ServiceAccount User Id (mco_ServiceAccountUserId)')})
The category: 5 value identifies this as a cloud Flow. The xaml field is a legacy artefact required by the API but irrelevant for modern Flows. A single string('') keeps it happy.
Important: don’t type a space directly into item/xaml; set it to the expression string('') instead. A literal space gets saved against the cloned Flow and makes the solution export fail (Workflow export: FAILURE), which breaks any backup or ALM pipeline. string('') satisfies the required field but sends an empty value that Dataverse stores as null, exactly like a Flow built in the designer.
Bind the owner explicitly. item/ownerid@odata.bind sets the new Flow’s owner to the service account rather than whoever’s Dataverse connection ran the action. The value comes from an Environment Variable holding the service account’s systemuserid in this environment. Swap mco_ServiceAccountUserId for your own Environment Variable’s schema name. ⚠️ A user’s systemuserid is different in every environment, so don’t copy it from another one.
Prerequisite: the service account’s systemuserid. Before this works you need a Text Environment Variable (display name ServiceAccount User Id, schema name mco_ServiceAccountUserId) holding the service account’s Dataverse user ID. This is the systemuserid GUID from the systemusers table, not the Entra object ID. The quickest way to get it is to paste this into a browser where you’re signed in to the environment:
https://yourorg.crm.dynamics.com/api/data/v9.2/systemusers?$select=systemuserid,fullname&$filter=internalemailaddress eq 'serviceaccount@yourtenant.com'
Replace yourorg with your environment’s org URL (Power Platform admin center → Environments → your environment → Environment URL) and use your service account’s email. Copy the systemuserid from the JSON response into the Environment Variable’s current value.
The response from this action includes the new Flow’s workflowid, which is carried forward to the next steps.
Like any Flow created this way, the new Flow starts Off (statecode = 0, Draft). Step 8 turns it on.
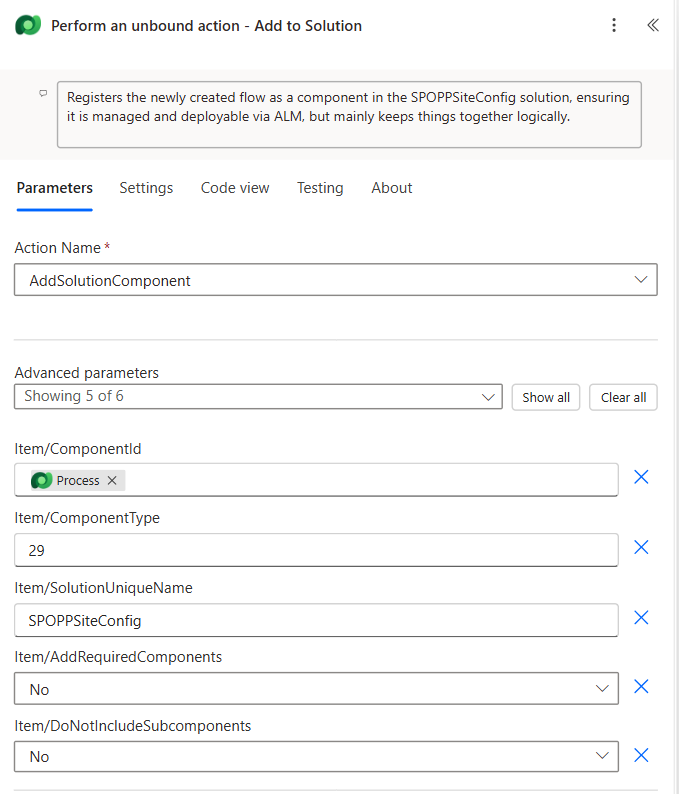
Step 6: Add to Solution (Perform an unbound action - Add to Solution)
With the Flow created, it exists in Dataverse but is not yet part of any solution. This step calls the AddSolutionComponent unbound action to register it under the SPOPPSiteConfig solution:
ComponentId:               (new Flow's workflowid)
ComponentType:             29    (Cloud Flow)
SolutionUniqueName:        SPOPPSiteConfig
AddRequiredComponents:     false
DoNotIncludeSubcomponents: false
Component type 29 maps to cloud Flows in the Dataverse component type enumeration. By adding it to the solution, the provisioned Flow becomes visible in the main solution and is logically grouped with the rest of the P&P components, making management cleaner.
Step 7: Write the Flow ID Back to Site Registry (Update a row - Site Registry)
This Dataverse write closes the loop: the new Flow’s ID is written back to the Site Registry record that triggered this whole process. This is mainly for record keeping and maintenance. As an added extra you could concatenate the full URL for the Flow if you wanted to.
Entity: Site_registries
Record ID: triggerBody()?['entity']['Site_Registryid']
Flowid: outputs('Add_a_new_row_-_Processes')?['body/workflowid']
After this step, the Site Registry row has a Flow ID value. This serves as:
- A human-readable audit trail (the admin can see which Flow was provisioned for which Site)
- A navigation link back to the provisioned Flow
- A signal that provisioning has completed for this Site
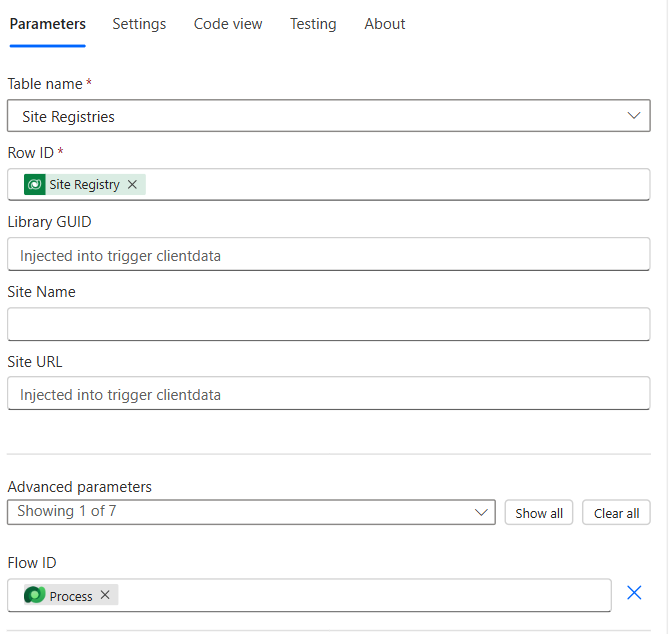
Step 8: Turn the Flow On
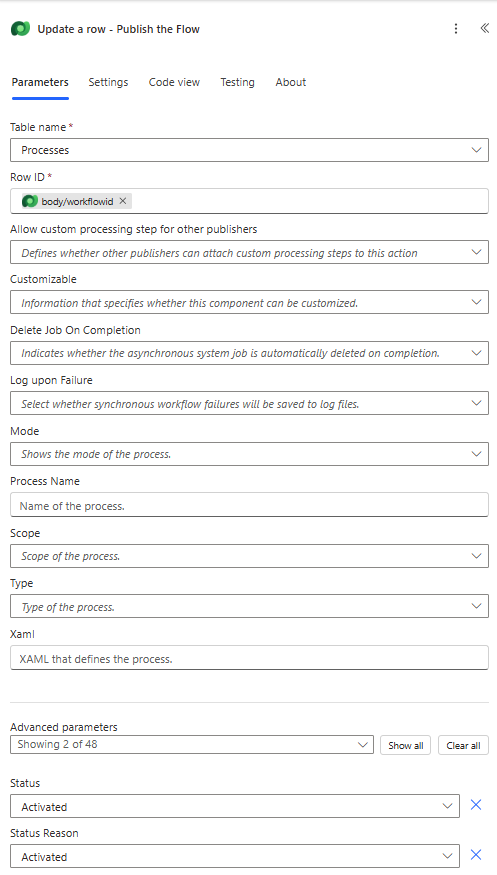
The final step turns the clone on with a plain Dataverse Update a row on the workflows table:
Action:        Update a row  (Microsoft Dataverse)
Table name:    Processes
Row ID:        outputs('Add_a_new_row_-_Processes')?['body/workflowid']
Status:        Activated   (statecode = 1)
Status Reason: Activated   (statuscode = 2)
 Then confirm it worked with Get a row by ID on the same row:
Action:         Get a row by ID  (Microsoft Dataverse)
Table name:     Processes
Row ID:         outputs('Add_a_new_row_-_Processes')?['body/workflowid']
Select columns: statecode,statuscode,_ownerid_value
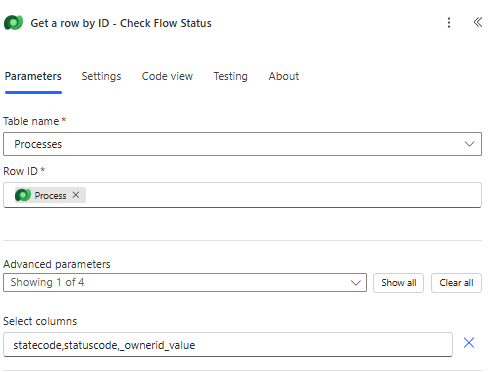
If statecode comes back as 1, the Flow is on and polling its Library. That’s it: no Teams card, no “open the Flow and click Save”, no service account sign-in.
This only works if the right account runs it. The Dataverse connection behind this Update a row must be signed in as the service account, and the service account must own every connection the clone uses. If either isn’t true you get ConnectionAuthorizationFailed. Both are explained below.
Why not just use the Power Automate Management Turn On Flow action? I tried. It doesn’t work, and the next section explains why.
Error Handling: Scope Catch
If any action inside the Try scope fails, times out, or is skipped, the Catch scope runs. It:
- Filters
result('Scope_-_Try')to find the actions that failed, timed out, or were skipped - Builds a short error summary with a direct link to the failed run
- Terminates the run as Failed with that summary
❌ Provision Site Flow Failed
Site: {Sitename}
View Flow Run: [link]
Once resolved, re-trigger provisioning from the SPO P&P Administration app.
The original version posted this to Teams. I removed it: the service account doesn’t own a Teams connection, and any connection in the chain the service account can’t use is a liability (more on that below). If you trigger provisioning from a canvas app or custom page instead of the command bar, return the summary with Respond to a Power App or flow so the user sees it straight away.
The admin can inspect the failed run, resolve the root cause, and re-trigger provisioning from the app. Because the Site Registry record is only updated in Step 7 (after the clone exists in the solution), a partial failure before that point leaves Flow ID blank, signalling that provisioning is incomplete and can safely be re-run.
Why “Turn On Flow” Doesn’t Work
The obvious way to turn a Flow on from another Flow is the Power Automate Management connector’s Turn On Flow action (StartFlow). Placed after Add to Solution, it fails every time:
An unpublished solution flow cannot be activated. Please authenticate the flow
connections and save the flow to enable activation.
(CannotStartUnpublishedSolutionFlow, HTTP 409)
StartFlow restarts Flows; it can’t turn one on for the first time. It works on a Flow that has been on before, because that Flow already has a published version. A Flow created by inserting a row into workflows has never been published, so there’s nothing for StartFlow to start.
There is no separate “publish” action for cloud Flows either. For a solution cloud Flow, turning it on is publishing it. None of these will do it:
- Power Automate Management actions (Update Flow, Get Flow)
- Power Automate for Admins /
Enable-AdminFlow - pac CLI
PublishXml/PublishAllXml(these publish customisations, not Flows)
What does work is the documented route: a cloud Flow is a row in workflows, and its on/off state is the row’s statecode (0 Draft/Off, 1 Activated/On). Microsoft’s own docs note that Flows created through the API start as Draft and must be enabled. Updating statecode to 1 is that enable step, and the platform runs the same connection checks it would if you clicked Turn on in the portal.
You also don’t need shared_flowmanagement in your DLP policy for any of this. I added it temporarily to test Turn On Flow and took it straight back out.
Connections, Connection References and Who Is Signed In
When you turn a Flow on, the platform checks one thing: can the account turning it on use every connection the Flow depends on? Get that right and Step 8 works. Get it wrong and you’ll see ConnectionAuthorizationFailed with no obvious reason.
There are three separate things in play, and it’s easy to blur them.
The three pieces
| Piece | What it is | What matters |
|---|---|---|
| Connection | A stored credential for a connector (e.g. an OAuth sign-in to SharePoint). Created by whoever signs in. | Who owns it. That’s whose identity the connector acts as, and who can use it. |
| Connection reference | A solution component that points at a connection. Flow triggers and actions bind to the reference, not the connection. | Which connection it’s bound to (connectionid). The owner of the reference record itself doesn’t matter. |
| Activating identity | The account signed in on the Dataverse connection that runs Update a row in Step 8. | It must own (or have shared to it) every connection behind every reference in the clone. |
The cloned Flow’s owner (ownerid, set in Step 5) is a fourth thing. Setting it to the service account keeps the Flow out of any one person’s name, but it’s the connections that decide whether activation succeeds.
Worked example: the SharePoint connection
Here’s how the SharePoint side is wired in our solution.
- Create the connection as the service account. Sign in to Power Automate as
SVC.M365@mbpsolutions.com(an InPrivate window keeps your own session out of the way). Go to Connections → New connection → SharePoint and sign in. The connection is now owned by SVC.M365. - Give it a display name you can recognise. Rename the connection to something like
SPOPP - SharePoint - SVC.M365. By default a SharePoint connection is labelled with the account’s email address, so if you’ve got three SharePoint connections they all look the same in a dropdown. A clear name makes the next step foolproof. - Bind the connection reference to it. In the solution, open the connection reference
mbp_mco_SPOPPSharePoint(display name SPOPP - SharePoint), choose Edit, and pickSPOPP - SharePoint - SVC.M365from the Connection list. This sets the reference’sconnectionid. - Point the template at the reference. Still signed in as SVC.M365, open the template and make sure the trigger and the
Get file propertiesaction both usembp_mco_SPOPPSharePoint. - Run Step 8 as the service account. The Dataverse connection reference used by Update a row (
mbp_mco_SPOPPDataversein our case) is bound to a Dataverse connection SVC.M365 owns.
When Step 8 runs, the caller is SVC.M365. The platform looks at the clone, sees mbp_mco_SPOPPSharePoint, follows it to SPOPP - SharePoint - SVC.M365, confirms SVC.M365 owns it, and turns the Flow on.
What it looks like when it’s wrong
Our first run failed with ConnectionAuthorizationFailed. The error named the caller’s object ID, which turned out to be SVC.M365, so the activating account was right. The problem was the template: its trigger and one action still used an old auto-generated reference, new_sharedsharepointonline_4f0e7, bound to a connection SVC.M365 couldn’t use. The clone had copied it faithfully.
The fix was to repoint both operations at mbp_mco_SPOPPSharePoint. Two things are worth knowing from that:
- The designer hides references you can’t use. The connection picker only lists references whose connection the signed-in user can use. Once the reference’s connection belonged to SVC.M365, I couldn’t select it signed in as myself. That’s why you edit the template as the service account. Editing it as yourself tempts you into picking a reference bound to your connection, and every clone inherits it.
- Every connector counts. The templates also posted to Teams through a reference bound to a Teams connection SVC.M365 didn’t own. Activation would have failed on that next. If the service account can’t own a connection for a connector, either give it one or take the connector out of the template. I took Teams out.
If you trigger provisioning from an app
If ordinary users run provisioning from a canvas app or custom page, two more settings matter:
- Run-only users: on the Provisioning Flow, set every connection to Use this connection (the service account’s), not Provided by run-only user. That’s what lets someone with no access to those connections trigger it.
- Refresh the Flow in the app as the service account. Power Apps requires whoever adds or refreshes a Flow in an app to be able to use all of that Flow’s connections. After changing the Flow’s connections, refresh it in the app signed in as the service account, then publish. If you don’t, the app keeps stale connection settings and fails with
NotAllowedConnectionReference … can not be given by invoker.
Error lookup
| Error | Meaning |
|---|---|
CannotStartUnpublishedSolutionFlow | You used Turn On Flow (StartFlow) on a Flow that’s never been published. Use the statecode update instead. |
ConnectionAuthorizationFailed (on Update a row) | A reference in the clone is bound to a connection the caller can’t use. Check the template’s references. |
XrmConnectionReferenceMissingConnection | A connection reference has no connectionid. Bind it to a connection. |
NotAllowedConnectionReference … can not be given by invoker | The app has stale Flow connection settings. Refresh the Flow in the app. |
ConnectionAuthorizationFailed (adding a Flow to an app) | The maker can’t use the Flow’s connections. Refresh as the service account. |
The Child Approval Flow
This is the central Flow that the cloned trigger Flows hand off to. The team can iterate on this Flow as much as needed without worrying about duplicate actions, because the process only lives here.
The Child: PP Approval Standard Process is a manually-triggered child Flow that accepts seven parameters from every approval trigger:
| Parameter | Description |
|---|---|
ItemID | SharePoint list item ID |
SiteURL | URL of the Site (passed through, not hardcoded) |
ListGUID | Library GUID (passed through) |
AuthorClaims | Claims string of the document author |
FullPath | Server-relative path of the document |
ApprovalStatus | Numeric approval status value from SharePoint |
Editor | Claims string of the last editor |
On receipt, it:
- Checks the item isn’t already approved (terminates gracefully if it is)
- Builds the server-relative URL via a
Composeexpression - Calls the SharePoint REST API to publish the document (
_api/web/GetFileByServerRelativeUrl(...)/Publish) - Reads the updated file properties back from SharePoint
- Calls the SharePoint REST API to set the approval status to Approved (
OData__ModerationStatus: 0), records the approval date and updates any other column metadata required - Posts a Teams message to the document author confirming approval and the new version number
Because the Site URL and Library GUID are passed in as parameters (not hardcoded), this single child Flow serves every cloned approval trigger across the entire organisation.
How It All Fits Together
Here’s the end-to-end lifecycle for adding a new P&P Site to the system:
1. Admin creates a SharePoint Online Site and Document Library
2. Admin notes the Library GUID (from the SharePoint URL or list settings)
3. Admin opens the SPO P&P Administration app
4. Admin creates a new Site Registry row:
      Site Name:    "Finance"
      Site URL:     https://companysite.sharepoint.com/Sites/Finance
      Library GUID: [GUID from SharePoint]
5. Admin selects the row and runs "SPO PP - Provision Site Flow" from the command bar
6. Flow runs (~10 seconds):
      - Reads Site Registry row
      - Fetches template clientdata from Dataverse
      - Replaces Site URL and Library GUID placeholders
      - Creates new Flow: "SPO PP - Approval Trigger - Finance" (owned by the service account)
      - Adds Flow to SPOPPSiteConfig solution
      - Writes Flow ID back to Site Registry
      - Turns the new Flow on (statecode = 1) and confirms it
7. Finance P&P Site is live: approval triggers are active
From step 4 to a live Flow takes under a minute of admin time, with no Flow editing, no cloning and no sign-in as the service account.
Key Design Decisions
Why string replacement instead of a proper API?
Power Automate does not expose a public API for cloning Flows. The clientdata approach is the only programmatic path available without leaving the Power Platform. Microsoft documents creating cloud Flows through the workflows table with clientdata; the clone-by-replace part is our own pattern on top of that.
Why store Library GUID and not Library Name? GUIDs are immutable. Library names can be changed by Site owners without affecting the trigger. Storing the GUID avoids a class of hard-to-diagnose breakages.
Why a Dataverse update instead of Turn On Flow?
Turn On Flow only restarts Flows that have already been published, and a freshly cloned Flow never has. Setting statecode = 1 on the workflows row is the supported way to turn on a Flow created through Dataverse, and it runs the same connection checks as the portal’s Turn on button.
Why does everything run as the service account? Activation succeeds only if the activating account can use every connection in the clone. Making the service account the owner of every connection, the activating identity and the Flow owner means no Flow depends on one person’s account, and nobody has to sign in as the service account to switch a Site on.
Why add the Flow to the solution?
It keeps all provisioned Flows grouped under SPOPPSiteConfig in the environment. This makes bulk management, export, and environment promotion practical, rather than having dozens of orphaned Flows scattered across the default solution.
Environment Constraint: Unmanaged Required ⚠️ One big constraint worth flagging: the Environment where the provisioned flows are created must be unmanaged. The cloning mechanism writes new rows directly to the workflows table at runtime. Those flows are unmanaged artefacts. They exist outside the solution package and outside the ALM pipeline. That is intentional; they are site-specific, runtime-generated, and self-service by design. But it means a managed-solution environment is incompatible with this pattern. The provisioning Flow will run fine as a managed component, but the governance model of a managed environment conflicts with generating unmanaged Flow records inside it.
The default environment is the most common candidate simply because it is typically unmanaged, but the constraint is unmanaged vs. managed, not default vs. non-default. Any unmanaged environment works.
Summary
The project delivered a self-service Site provisioning capability built on a single mechanism: reading a Flow’s clientdata from Dataverse, replacing two placeholder strings, writing the result back as a new workflows row, and switching it on with a statecode update. The Site Registry table is the operational hub: it drives provisioning and records the outcome. The template Flow is the blueprint, stable and never activated, just there to be cloned.
The piece that took longest to get right wasn’t the cloning, it was the connections. Make one account own every connection, bind every connection reference to those connections, and run the activation as that account. Do that and adding a new P&P Site is a data entry task, not a development task.