
I had been meaning to share this knowledge wider for a long time. This post was written alongside Claude Opus 4.8 using a custom “My Voice” skill. Every word is checked and verified by me — but without Claude’s help it wouldn’t have got written, and I think being upfront about that matters. Here goes.
Send Sales Orders to Zoho Sign from Zoho CRM with a Custom Deluge Function
Overview
The native Zoho CRM ↔ Zoho Sign integration is fine for the simplest case: pick a template, pick a recipient, hit send. The moment you want anything beyond that — control the document name, pick the template dynamically, write a linked record back to CRM, or react to API failures — you hit the ceiling.
This post walks through a custom Deluge function that does all of that. It runs from a button on a Sales Order, generates a PDF from a CRM Inventory Template, posts it to the Zoho Sign API, renames the document on the way in, links the resulting Sign request back to the original Sales Order, and opens the signing UI in a popup. Errors are caught and emailed to support.
Like me if you’re coming from the Power Platform world, this post also explains why this is a Deluge function and not a Zoho Flow — that bit alone is worth reading if you’ve ever wondered why Zoho’s no-code workflow tool gets sidelined for jobs like this.
Why not just use the standard integration (or Zoho Flow)?
In Power Automate, you’d authorise the relevant connectors once, drop them into a cloud flow, and you’d be done. The connector handles auth on your behalf and the flow can run as a service account for everyone in the tenant.
Zoho doesn’t work that way. Two things matter here:
zohocrm→zohocrmcalls need a Connection. When you call Zoho CRM’s REST endpoints from inside Zoho CRM (yes, really — calling itself), you authorise a named Connection at Setup → Developer Space → Connections. You authorise it once, as a service account, and every Deluge function in the org uses it. This is the connection that pulls the PDF from the Inventory Template.zoho.sign.createDocumentneeds a per-user Connection too — but in Zoho Flow, that connection is per end user. Each user of the flow has to authenticate their own Zoho Sign connection. There’s no shared, service-account-style auth available in Flow for Zoho Sign. So if 30 sales reps need to send signing requests, you’re herding 30 individual OAuth handshakes, with all the breakage and re-auth that implies.
In CRM Deluge functions, the Connection is authorised once by a developer/admin and re-used. Same effect as a Power Automate connection authorised on a service principal. That’s the entire reason this lives in a Deluge function rather than a Zoho Flow — Flow’s per-user auth model for Sign rules it out for any multi-user business process.
The other limitations of the native CRM ↔ Sign integration that this function works around:
- Document name is hard-coded to the template name, not the record context (you get five PDFs called Sales_Order 01150654064064.pdf in your Sign inbox).
- No place to inject CRM context into the recipient assignment beyond what the template exposes.
- No structured error handling — if Sign rejects the request, the user sees a generic “something went wrong”.
What the function does (step by step)
- Collects field values from the Sales Order — order number, subject, contact (recipient name + email). This can also be extended as much as required for you specific process.
- Generates a PDF by calling the CRM
print_previewendpoint against a specific Inventory Template, via thezohocrmConnection. - Posts the PDF to Zoho Sign with
zoho.sign.createDocument, supplying a name, the SIGN action, and a single ordered recipient. - Renames the document inside the Sign request (the file gets uploaded with whatever name
print_previewgave it — we override it to<Order Number> - <Subject>). - Creates a record in the
zohosign__ZohoSign_Documentsmodule linking the Sign request back to the Sales Order. - Opens the Sign UI in a popup window so the user lands directly on the signing setup screen.
- Catches errors at every external call and emails the IT support desk with the record URL and error details.
Key capabilities vs the standard integration
- Custom document naming —
<Order Number> - <Subject>instead of the template’s default name. You can restructure this any way you want. - Dynamic recipient resolution — pulled from
Contact_Nameon the Sales Order, not hard-coded on the template. - Linked record creation — a
zohosign__ZohoSign_Documentsrow is written immediately, withModule_Record_IDpointing back at the Sales Order, so the Sign request is visible from the related list. - Structured error notifications — Zoho Sign API failures send a formatted email to support with the CRM record link, error code, and message.
Use cases
- Sales orders where the PDF needs a meaningful filename for the customer’s records and your audit trail.
- Contract issuance workflows where the signer is always derived from a CRM lookup (Contact, Account owner, etc.) rather than typed in.
- Multi-user signing flows where every salesperson sending documents through Zoho Sign would otherwise need their own authorised Connection (the Zoho Flow blocker).
- Document-pack scenarios where you want to build the Sign request server-side and then hand the user a popup to add fields, drag signature blocks, and send.
Technical deep dive
The function is invoked from a Button in the SalesOrders Module on the Sales Order layout. It receives the record Id and userID as arguments.
1. Collect the record data
SalesOrderid = zoho.crm.getRecordById("Sales_Orders", input.Id.toLong());
varSalesOrderNumber = SalesOrderid.get("Order_Number");
varSubject = SalesOrderid.get("Subject");
docname = varSalesOrderNumber + " - " + varSubject;

varExternal = SalesOrderid.get("Contact_Name");
recID = varExternal.get("id");
varExternalRec = zoho.crm.getRecordById("Contacts", input.recID.toLong());
varExternalFull_Name = varExternalRec.get("Full_Name");
varExternalEmail = varExternalRec.get("Email");
Two getRecordById calls — one for the Sales Order, one to resolve the Contact lookup into a full name and email address. docname is the custom filename that Sign will end up displaying.
2. Generate the PDF from the CRM template
varTemplateID = {YOUR_TEMPLATE_ID};

download = invokeurl
[
  url :"https://zohoapis.com/crm/v2/settings/inventory_templates/"
    + varTemplateID + "/actions/print_preview?record_id=" + Id + "&print_type=pdf"
  type :GET
  connection:"zohocrm"
];
Two things to call out:
- The template ID is the value in the URL when you edit the template in CRM —
.../settings/inventory_templates/<this bit>/edit. connection:"zohocrm"is the named Connection authorised under a service account. If this Connection is missing or revoked, this is the first thing to fail — the response will be empty or contain an error string. The function checks both:
if (download == null || download == "") {
  // log + return error
}
if (download.contains("error")
  || download.contains("unauthorized")
  || download.contains("invalid")) {
  // log + return error
}
3. Build the Zoho Sign request payload Create Document API
actions = {{
  "recipient_name": varExternalFull_Name,
  "recipient_email": varExternalEmail,
  "signing_order": 1,
  "action_type": "SIGN"
}};

dummydata = Map();
dummydata.put("requests", {
  "request_name": docname,
  "is_sequential": true,
  "actions": actions
});

requestMap = Map();
requestMap.put("data", dummydata);

respSign = zoho.sign.createDocument(download, requestMap, "crmtosignconnection");
The payload mirrors the Zoho Sign create document API shape: a requests object containing request_name, is_sequential, and an actions array of recipients. Here there’s a single external SIGN recipient — extending this to multi-signer is just adding more entries to actions with incrementing signing_order values.
zoho.sign.createDocument takes three arguments: the file payload (the PDF we just downloaded), the data map, and the named Sign Connection (crmtosignconnection in this example, set up at Setup → Developer Space → Connections with the relevant ZohoSign.documents.CREATE scope).
The response is checked before we go any further:
if (respSign.get("status") == "failure") {
  signErrorCode = respSign.get("code");
  signErrorMsg = respSign.get("message");
  // sendmail to support with the CRM record URL and details
  return "ERROR: Zoho Sign document creation failed...";
}
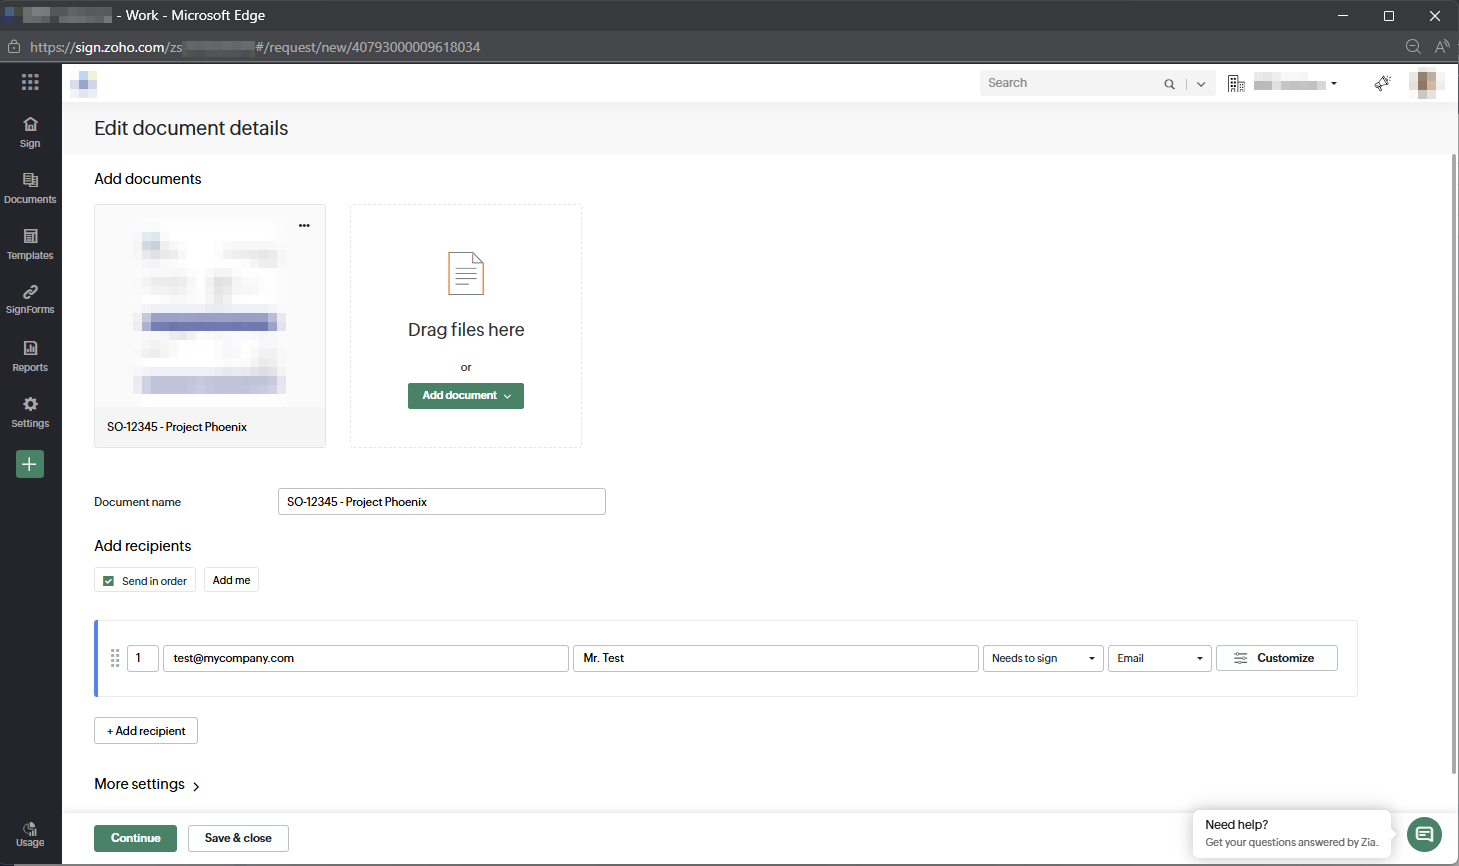
4. Rename the document inside the Sign request
The PDF arrives in Sign with whatever name print_preview produced. We override it:
documents_ids = resp.get("document_ids");
document = documents_ids.get(0);
document_id = document.get("document_id");

documentMap = Map();
documentMap.put("document_name", docname);
documentMap.put("document_id", document_id);
documentMap.put("document_order", 0);

requests = Map();
requests.put("document_ids", { documentMap });

dataMap = Map();
dataMap.put("data", { "requests": requests });

response = zoho.sign.updateDocument(reqID, dataMap);
This is the bit that gives you human-readable filenames in Zoho Sign — SO-12345 - Project Phoenix rather than Sales_Order 01150654064064.pdf. It’s a separate API call because the create endpoint doesn’t accept a per-document document_name override at upload time.
5. Write the linked record back to CRM
record = {
  "Name": varSalesOrderNumber,
  "zohosign__Module_Name": "Sales_Orders",
  "zohosign__ZohoSign_Document_ID": reqID,
  "Owner": userID,
  "zohosign__Contact": SalesOrderid.get("Contact_Name"),
  "zohosign__Date_Sent": zoho.currentdate,
  "zohosign__Document_Status": "Drafted",
  "zohosign__Module_Record_ID": Id
};
create = zoho.crm.createRecord("zohosign__ZohoSign_Documents", record);
zohosign__ZohoSign_Documents is the module the Zoho Sign extension installs. Writing a row to it with Module_Name and Module_Record_ID is what makes the Sign request appear in the Sales Order’s related list. The native integration does this for you; here we do it ourselves because the native integration isn’t involved.
6. Open the Sign UI
varURL = "https://sign.zoho.com/zs/{zohosignorgid}/request/new/" + reqID;
openUrl(varURL, "popup window", "height=800px,width=1460");
return "";
The user gets dropped into the Sign setup screen for the request that was just created. From here they drag signature/date/text fields onto the PDF and send.
How to set this up
Prerequisites
- Zoho CRM with Admin access (to install the Zoho Sign extension, create Connections, deploy functions, and add buttons).
- Zoho Sign Org, with an Organisation ID you can read from the URL when logged in.
- A Service Account user with access to CRM — this is who authorises the Connections.
1. Install the Zoho Sign extension in CRM
This installs the zohosign__ZohoSign_Documents module and related fields. Setup → Marketplace → Zoho → Zoho Sign for CRM. We’ll use this to build upon, plus this serves as a bare-bones backup if anything goes wrong.
2. Create the Inventory Template
Build the document layout you want signed — quote, sales order, contract — as a CRM Inventory Template against the Sales Orders module. Note the template ID from the URL when editing.
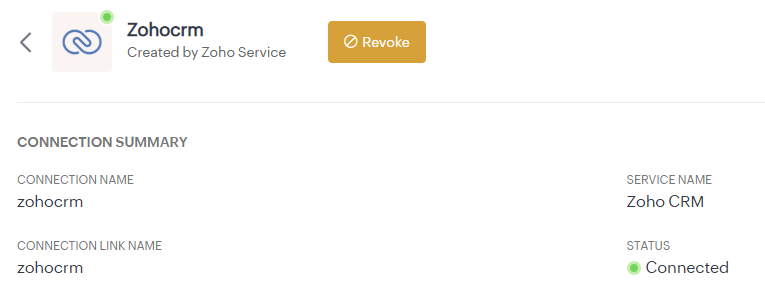
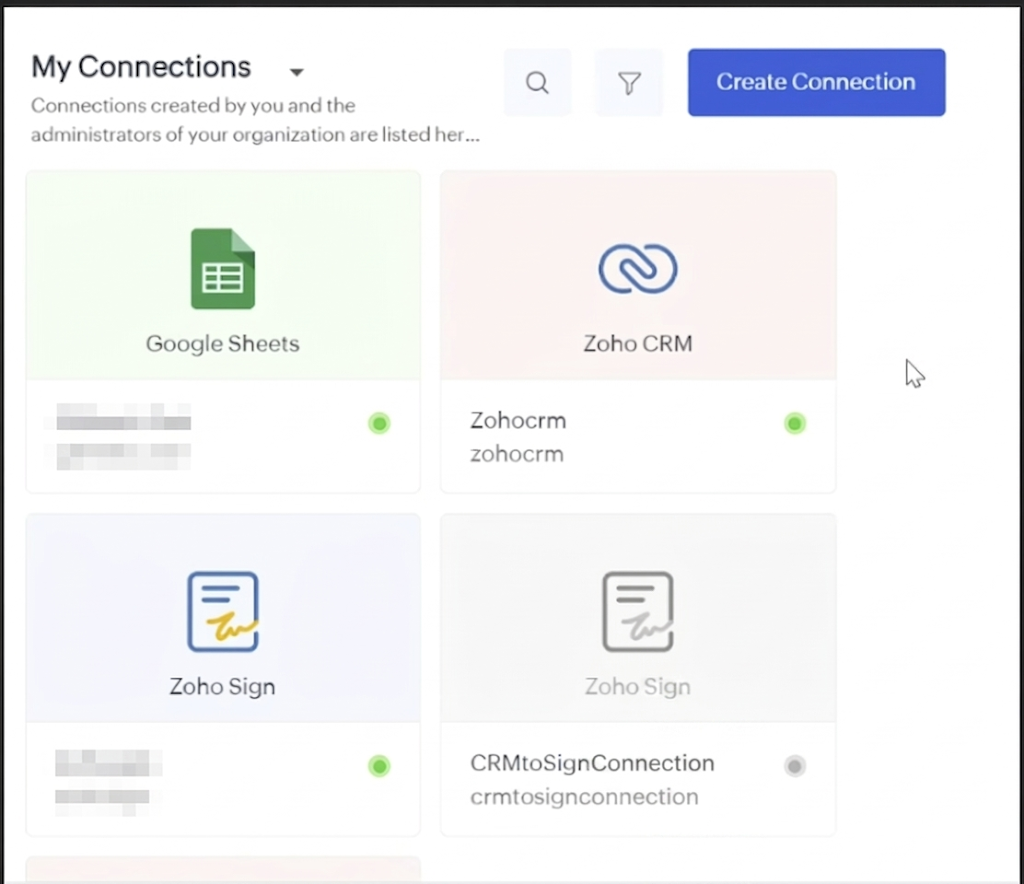
3. Create the two Connections
Both connections live at Setup → Developer Space → Connections. They serve different purposes and have very different onboarding stories.
Connection 1: zohocrm
This connection calls the Zoho CRM REST API from inside Zoho CRM itself — yes, CRM calling itself — to pull the PDF from the Inventory Template via print_preview. It is authorised once by the service account and shared with all relevant profiles.
Important: the connection name must exactly match the string used in the function. The invokeurl block references connection:"zohocrm" — if you name yours differently, the call fails silently. Name it zohocrm.
Setup steps:
- Go to Setup → Developer Space → Connections → New Connection.
- Choose Default Zoho OAuth.
- Set the Connection Name to
zohocrm. - Add scopes: ZohoCRM.templates.inventory.READ — required by the print_preview endpoint to fetch the PDF from the Inventory Template. ZohoCRM.modules.salesorders.READ — required to fetch the Sales Order record. ZohoCRM.modules.contacts.READ — required to resolve the Contact lookup for the recipient name and email.
- Click Create and Connect and authorise as the service account.
- Once created, share the connection with the profiles that need to use the button.
One caveat worth noting: print_preview isn’t documented as a distinct endpoint in the v8 docs — it’s an undocumented action on the inventory templates path. If you hit a permission error in practice, ZohoCRM.modules.salesorders.READ added to the template scope is the likely fix.
Connection 2: crmtosignconnection
This is where it gets more involved. Unlike the zohocrm connection above, crmtosignconnection must be authorised individually by each user who will use the button. This is a Zoho Sign OAuth requirement — Sign issues tokens per-user, not per-org, so there’s no shared service-account-style auth available for this one.
This is also the exact reason this entire solution is a Deluge function and not a Zoho Flow. In Zoho Flow, the per-user Sign connection would need to be set up inside the flow itself, requiring every user to individually authenticate before the flow can run on their behalf. In a CRM Deluge function with a named Connection, you manage the auth once per user through a controlled IT process — a much more supportable pattern.
IT Support should run the following steps for each new user:
Step 1 — Assign the user to the correct role
Navigate to the user record and assign the ‘Send to Sign Integration’ permission set:
https://crm.zoho.com/crm/org{ZohoCRMorgId}/settings/users/
Step 2 — Temporarily enable the Connection on the user’s profile
Navigate to the profile and enable access to crmtosignconnection:
https://crm.zoho.com/crm/org{ZohoCRMorgId}/settings/profiles/
This permission is enabled temporarily to allow the user to complete the OAuth flow in the next step.
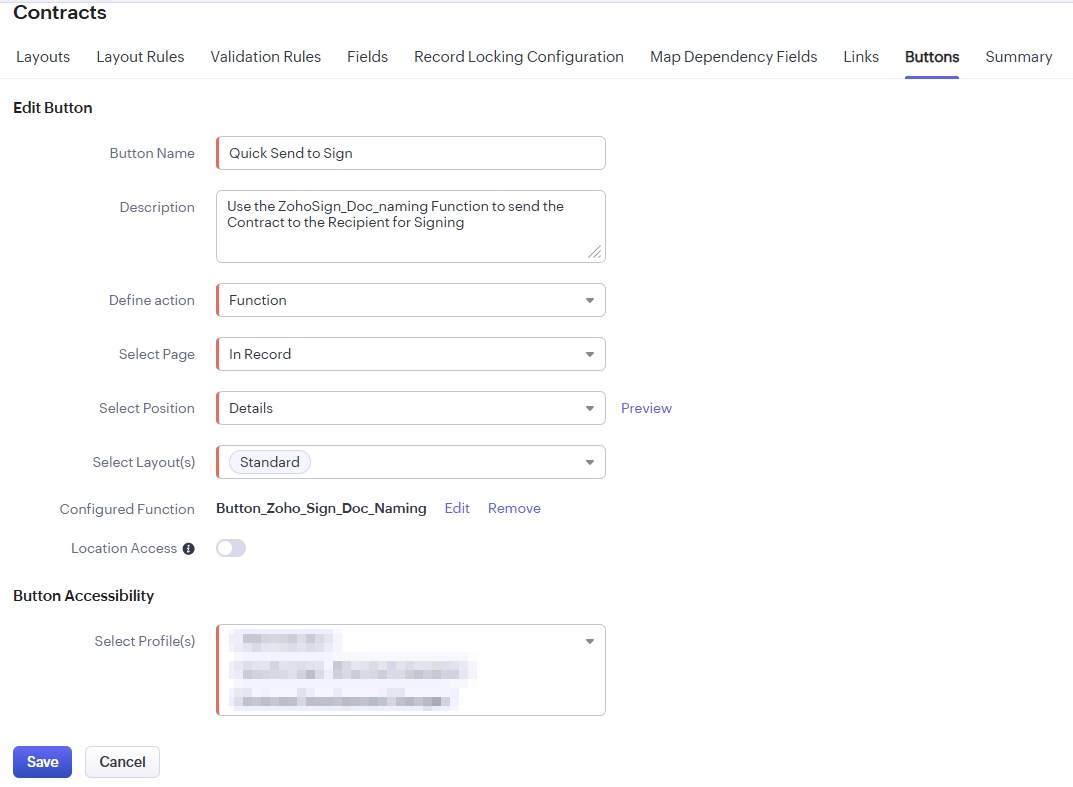
[Screenshot: Profile settings with crmtosignconnection enabled]
Step 3 — Have the user authenticate the Connection
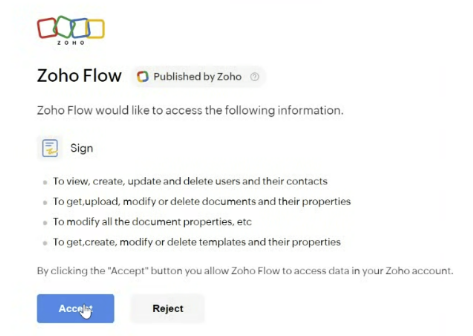
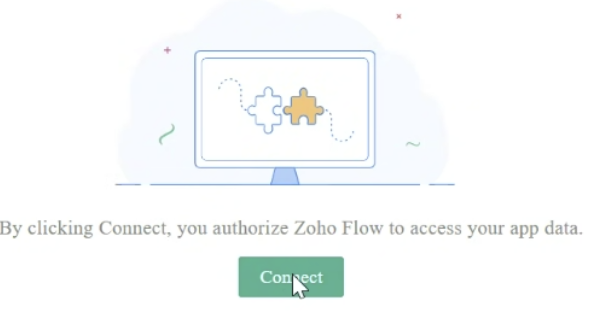
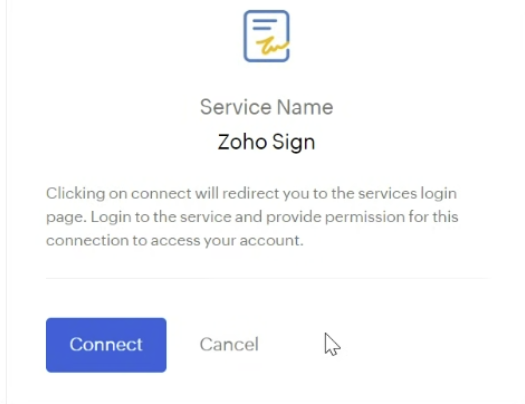
Ask the user to navigate to Setup → Developer Space → Connections, find crmtosignconnection, and click Connect. They will be prompted to accept three consecutive OAuth permission pop-ups. They must click Accept or Connect on each one. This authenticates them against Zoho Sign under their own account.
Step 4 — Disable the profile permission
Once the user has authenticated, go back to the profile and remove the temporary Connection permission. The user’s token is now stored and the button will work without them needing direct access to the Connections settings page.
Step 5 — Test the button and allow pop-ups
Have the user open a Sales Order record and click the button. If the Zoho Sign UI does not appear, their browser is likely blocking pop-ups from Zoho CRM — they’ll need to allow pop-ups for crm.zoho.com in their browser settings.

Heads up for admins: this onboarding process needs repeating for every new user added to this workflow. It’s worth documenting it as a runbook in your IT support knowledge base so the steps don’t get lost.
4. Deploy the function
Setup → Developer Space → Functions → New Function (Standalone). Paste the code, replace {YOUR_TEMPLATE_ID}, {ZohoCRMorgId} and {zohosignorgid} with your real values, and replace the support email with your team’s inbox. Save and enable REST API endpoint or attach to a button (next step).
5. Attach to a button
Setup → Customisation → Modules → Sales Orders → Links and Buttons → New Button. Place it on the Detail Page layout, set the action to Writing Function, point it at your function, and pass the record Id and loginuserid (or equivalent) as arguments.
Error handling strategy
There are three failure points worth being defensive about:
zohocrmConnection is dead — token revoked, scope changed, service account password reset. Thedownloadvariable comes back empty or contains an error string. The function bails, logs the connection name and authorising user, and returns a clear message to the user.- Zoho Sign rejects the create request — usually a scope problem on
crmtosignconnection, an invalid recipient email, or the document binary being malformed.respSign.get("status") == "failure"catches this. The function emails support with the CRM record URL, Sign error code, and message. - Anything else — caught by the top-level
try/catch. Same email pattern.
The reason this matters: button-triggered functions return a string that’s shown to the user as an alert. Without the explicit checks, a half-failed run looks like a success from the user’s perspective (no red error, but no Sign document either). The targeted checks turn silent failures into either visible errors or — better — actionable support tickets that include the record URL so the issue can be reproduced.
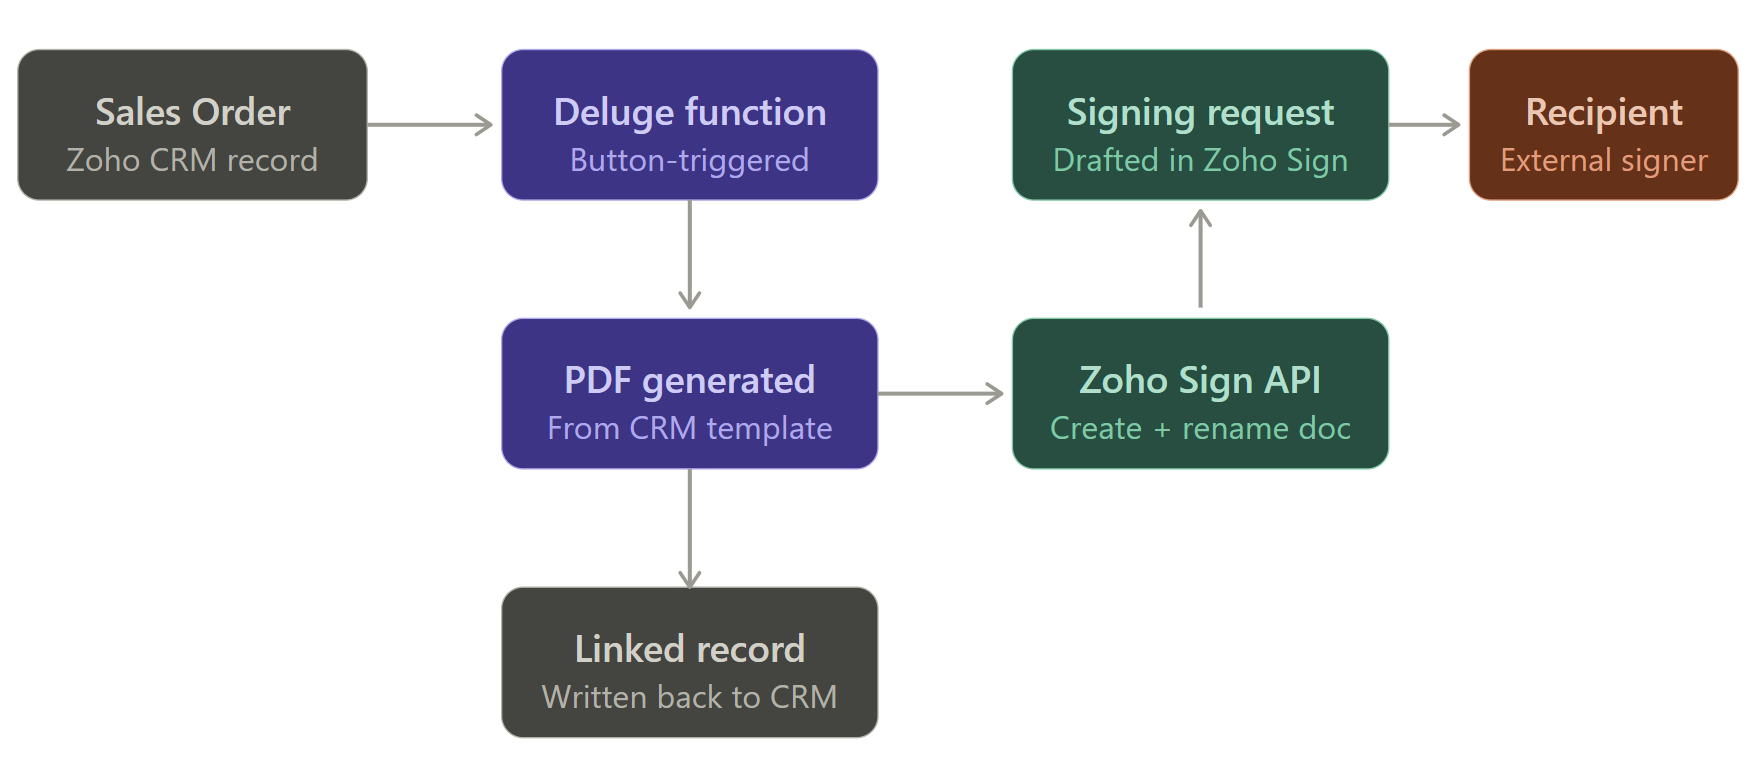
Process flow
The flow at a glance: the Sales Order is the starting point, the Deluge function orchestrates the PDF generation and the Sign API call, and the linked record is written back to CRM so the signing request is visible from the Sales Order’s related list. See the diagram rendered above the post.
Conclusion
The native Zoho CRM ↔ Zoho Sign integration is built for the 80% case. The other 20% — custom naming, dynamic recipients, linked records, structured error handling, multi-user auth — is where you reach for a Deluge function and the Zoho Sign API.
Coming from the Power Platform, the auth model is the bit that takes the most getting used to. There’s no Power Automate-style “authorise once, use everywhere” connector for Zoho Sign in Zoho Flow — every user authenticates their own connection, which is why Flow is a non-starter for shared business processes. CRM Deluge functions, with named Connections authorised by a service account, give you the equivalent of a connection reference on a service principal. Once that’s in place, the rest is just API plumbing.
Extend this however you like: multi-signer workflows, conditional templates based on order value, post-signature webhooks to push the signed PDF into SharePoint, attribute-based recipient resolution. The shape stays the same — collect, generate, send, link, handle errors.